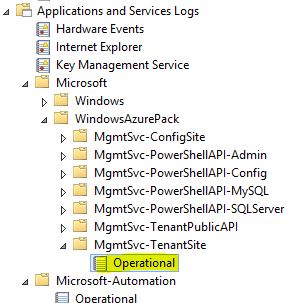
Log Name: Microsoft-WindowsAzurePack-MgmtSvc-TenantSite/Operational
Source: Microsoft-WindowsAzurePack-MgmtSvc-TenantSite
Date: 2017-05-08 10:33:37
Event ID: 232
Task Category: (59)
Level: Error
Keywords: None
User: IIS APPPOOL\MgmtSvc-TenantSite
Computer: SERVERNAME
Description:
Potential version mismatch between WAP and SPF, please verify both component's versions and if they're compatible, Exception: 'System.Data.Services.Client.DataServiceRequestException: An error occurred while processing this request. ---> System.Data.Services.Client.DataServiceClientException: <?xml version="1.0" encoding="utf-8"?><m:error xmlns:m="http://schemas.microsoft.com/ado/2007/08/dataservices/metadata"><m:code /><m:message xml:lang="en-US">An error occurred while processing this request.</m:message><m:innererror><m:message>The property 'VMNetworkId' does not exist on type 'VMM.NewVMVirtualNetworkAdapterInput'. Make sure to only use property names that are defined by the type.</m:message><m:type>Microsoft.Data.OData.ODataException</m:type><m:stacktrace> at Microsoft.Data.OData.ReaderValidationUtils.ValidateValuePropertyDefined(String propertyName, IEdmStructuredType owningStructuredType, ODataMessageReaderSettings messageReaderSettings, Boolean& ignoreProperty)
at Microsoft.Data.OData.Atom.ODataAtomPropertyAndValueDeserializer.ReadPropertiesImplementation(IEdmStructuredType structuredType, ReadOnlyEnumerable`1 properties, DuplicatePropertyNamesChecker duplicatePropertyNamesChecker, Boolean epmPresent)
at Microsoft.Data.OData.Atom.ODataAtomPropertyAndValueDeserializer.ReadComplexValue(IEdmComplexTypeReference complexTypeReference, String payloadTypeName, SerializationTypeNameAnnotation serializationTypeNameAnnotation, DuplicatePropertyNamesChecker duplicatePropertyNamesChecker, Boolean epmPresent)
at Microsoft.Data.OData.Atom.ODataAtomPropertyAndValueDeserializer.ReadNonEntityValueImplementation(IEdmTypeReference expectedTypeReference, DuplicatePropertyNamesChecker duplicatePropertyNamesChecker, CollectionWithoutExpectedTypeValidator collectionValidator, Boolean validateNullValue, Boolean epmPresent)
at Microsoft.Data.OData.Atom.ODataAtomPropertyAndValueDeserializer.ReadCollectionValue(IEdmCollectionTypeReference collectionTypeReference, String payloadTypeName, SerializationTypeNameAnnotation serializationTypeNameAnnotation)
at Microsoft.Data.OData.Atom.ODataAtomPropertyAndValueDeserializer.ReadNonEntityValueImplementation(IEdmTypeReference expectedTypeReference, DuplicatePropertyNamesChecker duplicatePropertyNamesChecker, CollectionWithoutExpectedTypeValidator collectionValidator, Boolean validateNullValue, Boolean epmPresent)
at Microsoft.Data.OData.Atom.ODataAtomPropertyAndValueDeserializer.ReadProperty(String expectedPropertyName, IEdmTypeReference expectedPropertyTypeReference, ODataNullValueBehaviorKind nullValueReadBehaviorKind, Boolean epmPresent)
at Microsoft.Data.OData.Atom.ODataAtomPropertyAndValueDeserializer.ReadPropertiesImplementation(IEdmStructuredType structuredType, ReadOnlyEnumerable`1 properties, DuplicatePropertyNamesChecker duplicatePropertyNamesChecker, Boolean epmPresent)
at Microsoft.Data.OData.Atom.ODataAtomEntryAndFeedDeserializer.ReadAtomContentElement(IODataAtomReaderEntryState entryState)
at Microsoft.Data.OData.Atom.ODataAtomEntryAndFeedDeserializer.ReadAtomElementInEntry(IODataAtomReaderEntryState entryState)
at Microsoft.Data.OData.Atom.ODataAtomEntryAndFeedDeserializer.ReadEntryContent(IODataAtomReaderEntryState entryState)
at Microsoft.Data.OData.Atom.ODataAtomReader.ReadAtEntryStartImplementation()
at Microsoft.Data.OData.ODataReaderCore.ReadImplementation()
at Microsoft.Data.OData.ODataReaderCore.InterceptException[T](Func`1 action)
at System.Data.Services.Serializers.EntityDeserializer.ReadEntry(ODataReader odataReader, SegmentInfo topLevelSegmentInfo)
at System.Data.Services.Serializers.EntityDeserializer.Read(SegmentInfo segmentInfo)
at System.Data.Services.Serializers.ODataMessageReaderDeserializer.Deserialize(SegmentInfo segmentInfo)</m:stacktrace></m:innererror></m:error>
--- End of inner exception stack trace ---
at System.Data.Services.Client.SaveResult.HandleResponse()
at System.Data.Services.Client.BaseSaveResult.EndRequest()
at System.Data.Services.Client.DataServiceContext.EndSaveChanges(IAsyncResult asyncResult)
at System.Threading.Tasks.TaskFactory`1.FromAsyncCoreLogic(IAsyncResult iar, Func`2 endFunction, Action`1 endAction, Task`1 promise, Boolean requiresSynchronization)
--- End of stack trace from previous location where exception was thrown ---
at System.Runtime.CompilerServices.TaskAwaiter.ThrowForNonSuccess(Task task)
at System.Runtime.CompilerServices.TaskAwaiter.HandleNonSuccessAndDebuggerNotification(Task task)
at System.Runtime.CompilerServices.TaskAwaiter.ValidateEnd(Task task)
at Microsoft.WindowsAzure.Server.VM.TenantExtension.Controllers.VMController.<CreateVMInstanceFromTemplate>d__2dc.MoveNext()
--- End of stack trace from previous location where exception was thrown ---
at System.Runtime.CompilerServices.TaskAwaiter.ThrowForNonSuccess(Task task)
at System.Runtime.CompilerServices.TaskAwaiter.HandleNonSuccessAndDebuggerNotification(Task task)
at lambda_method(Closure , Task )
at System.Web.Mvc.Async.TaskAsyncActionDescriptor.EndExecute(IAsyncResult asyncResult)
at System.Web.Mvc.Async.AsyncControllerActionInvoker.<>c__DisplayClass3f.<BeginInvokeAsynchronousActionMethod>b__3e(IAsyncResult asyncResult)
at System.Web.Mvc.Async.AsyncControllerActionInvoker.EndInvokeActionMethod(IAsyncResult asyncResult)
at System.Web.Mvc.Async.AsyncControllerActionInvoker.<>c__DisplayClass37.<>c__DisplayClass39.<BeginInvokeActionMethodWithFilters>b__33()
at System.Web.Mvc.Async.AsyncControllerActionInvoker.<>c__DisplayClass4f.<InvokeActionMethodFilterAsynchronously>b__49()
at System.Web.Mvc.Async.AsyncControllerActionInvoker.<>c__DisplayClass4f.<InvokeActionMethodFilterAsynchronously>b__49()
at System.Web.Mvc.Async.AsyncControllerActionInvoker.<>c__DisplayClass4f.<InvokeActionMethodFilterAsynchronously>b__49()
at System.Web.Mvc.Async.AsyncControllerActionInvoker.EndInvokeActionMethodWithFilters(IAsyncResult asyncResult)
at System.Web.Mvc.Async.AsyncControllerActionInvoker.<>c__DisplayClass25.<>c__DisplayClass2a.<BeginInvokeAction>b__20()
at System.Web.Mvc.Async.AsyncControllerActionInvoker.<>c__DisplayClass25.<BeginInvokeAction>b__22(IAsyncResult asyncResult)'
Event Xml:
<Event xmlns="http://schemas.microsoft.com/win/2004/08/events/event">
<System>
<Provider Name="Microsoft-WindowsAzurePack-MgmtSvc-TenantSite" Guid="{1AEFE747-B4B6-5C96-A6F0-4455628C98F5}" />
<EventID>232</EventID>
<Version>0</Version>
<Level>2</Level>
<Task>59</Task>
<Opcode>0</Opcode>
<Keywords>0x0</Keywords>
<TimeCreated SystemTime="2017-05-08T08:33:37.650860900Z" />
<EventRecordID>3708</EventRecordID>
<Correlation ActivityID="{27A52F79-9509-48EB-BCFD-412F5451CEE9}" />
<Execution ProcessID="4820" ThreadID="7048" />
<Channel>Microsoft-WindowsAzurePack-MgmtSvc-TenantSite/Operational</Channel>
<Computer>SERVERNAME</Computer>
<Security UserID="S-1-5-82-2412073939-1629192209-1361556002-1973534042-2256616803" />
</System>
<EventData>
<Data Name="exception">System.Data.Services.Client.DataServiceRequestException: An error occurred while processing this request. ---> System.Data.Services.Client.DataServiceClientException: <?xml version="1.0" encoding="utf-8"?><m:error xmlns:m="http://schemas.microsoft.com/ado/2007/08/dataservices/metadata"><m:code /><m:message xml:lang="en-US">An error occurred while processing this request.</m:message><m:innererror><m:message>The property 'VMNetworkId' does not exist on type 'VMM.NewVMVirtualNetworkAdapterInput'. Make sure to only use property names that are defined by the type.</m:message><m:type>Microsoft.Data.OData.ODataException</m:type><m:stacktrace> at Microsoft.Data.OData.ReaderValidationUtils.ValidateValuePropertyDefined(String propertyName, IEdmStructuredType owningStructuredType, ODataMessageReaderSettings messageReaderSettings, Boolean&amp; ignoreProperty)&#xD;
at Microsoft.Data.OData.Atom.ODataAtomPropertyAndValueDeserializer.ReadPropertiesImplementation(IEdmStructuredType structuredType, ReadOnlyEnumerable`1 properties, DuplicatePropertyNamesChecker duplicatePropertyNamesChecker, Boolean epmPresent)&#xD;
at Microsoft.Data.OData.Atom.ODataAtomPropertyAndValueDeserializer.ReadComplexValue(IEdmComplexTypeReference complexTypeReference, String payloadTypeName, SerializationTypeNameAnnotation serializationTypeNameAnnotation, DuplicatePropertyNamesChecker duplicatePropertyNamesChecker, Boolean epmPresent)&#xD;
at Microsoft.Data.OData.Atom.ODataAtomPropertyAndValueDeserializer.ReadNonEntityValueImplementation(IEdmTypeReference expectedTypeReference, DuplicatePropertyNamesChecker duplicatePropertyNamesChecker, CollectionWithoutExpectedTypeValidator collectionValidator, Boolean validateNullValue, Boolean epmPresent)&#xD;
at Microsoft.Data.OData.Atom.ODataAtomPropertyAndValueDeserializer.ReadCollectionValue(IEdmCollectionTypeReference collectionTypeReference, String payloadTypeName, SerializationTypeNameAnnotation serializationTypeNameAnnotation)&#xD;
at Microsoft.Data.OData.Atom.ODataAtomPropertyAndValueDeserializer.ReadNonEntityValueImplementation(IEdmTypeReference expectedTypeReference, DuplicatePropertyNamesChecker duplicatePropertyNamesChecker, CollectionWithoutExpectedTypeValidator collectionValidator, Boolean validateNullValue, Boolean epmPresent)&#xD;
at Microsoft.Data.OData.Atom.ODataAtomPropertyAndValueDeserializer.ReadProperty(String expectedPropertyName, IEdmTypeReference expectedPropertyTypeReference, ODataNullValueBehaviorKind nullValueReadBehaviorKind, Boolean epmPresent)&#xD;
at Microsoft.Data.OData.Atom.ODataAtomPropertyAndValueDeserializer.ReadPropertiesImplementation(IEdmStructuredType structuredType, ReadOnlyEnumerable`1 properties, DuplicatePropertyNamesChecker duplicatePropertyNamesChecker, Boolean epmPresent)&#xD;
at Microsoft.Data.OData.Atom.ODataAtomEntryAndFeedDeserializer.ReadAtomContentElement(IODataAtomReaderEntryState entryState)&#xD;
at Microsoft.Data.OData.Atom.ODataAtomEntryAndFeedDeserializer.ReadAtomElementInEntry(IODataAtomReaderEntryState entryState)&#xD;
at Microsoft.Data.OData.Atom.ODataAtomEntryAndFeedDeserializer.ReadEntryContent(IODataAtomReaderEntryState entryState)&#xD;
at Microsoft.Data.OData.Atom.ODataAtomReader.ReadAtEntryStartImplementation()&#xD;
at Microsoft.Data.OData.ODataReaderCore.ReadImplementation()&#xD;
at Microsoft.Data.OData.ODataReaderCore.InterceptException[T](Func`1 action)&#xD;
at System.Data.Services.Serializers.EntityDeserializer.ReadEntry(ODataReader odataReader, SegmentInfo topLevelSegmentInfo)&#xD;
at System.Data.Services.Serializers.EntityDeserializer.Read(SegmentInfo segmentInfo)&#xD;
at System.Data.Services.Serializers.ODataMessageReaderDeserializer.Deserialize(SegmentInfo segmentInfo)</m:stacktrace></m:innererror></m:error>
--- End of inner exception stack trace ---
at System.Data.Services.Client.SaveResult.HandleResponse()
at System.Data.Services.Client.BaseSaveResult.EndRequest()
at System.Data.Services.Client.DataServiceContext.EndSaveChanges(IAsyncResult asyncResult)
at System.Threading.Tasks.TaskFactory`1.FromAsyncCoreLogic(IAsyncResult iar, Func`2 endFunction, Action`1 endAction, Task`1 promise, Boolean requiresSynchronization)
--- End of stack trace from previous location where exception was thrown ---
at System.Runtime.CompilerServices.TaskAwaiter.ThrowForNonSuccess(Task task)
at System.Runtime.CompilerServices.TaskAwaiter.HandleNonSuccessAndDebuggerNotification(Task task)
at System.Runtime.CompilerServices.TaskAwaiter.ValidateEnd(Task task)
at Microsoft.WindowsAzure.Server.VM.TenantExtension.Controllers.VMController.<CreateVMInstanceFromTemplate>d__2dc.MoveNext()
--- End of stack trace from previous location where exception was thrown ---
at System.Runtime.CompilerServices.TaskAwaiter.ThrowForNonSuccess(Task task)
at System.Runtime.CompilerServices.TaskAwaiter.HandleNonSuccessAndDebuggerNotification(Task task)
at lambda_method(Closure , Task )
at System.Web.Mvc.Async.TaskAsyncActionDescriptor.EndExecute(IAsyncResult asyncResult)
at System.Web.Mvc.Async.AsyncControllerActionInvoker.<>c__DisplayClass3f.<BeginInvokeAsynchronousActionMethod>b__3e(IAsyncResult asyncResult)
at System.Web.Mvc.Async.AsyncControllerActionInvoker.EndInvokeActionMethod(IAsyncResult asyncResult)
at System.Web.Mvc.Async.AsyncControllerActionInvoker.<>c__DisplayClass37.<>c__DisplayClass39.<BeginInvokeActionMethodWithFilters>b__33()
at System.Web.Mvc.Async.AsyncControllerActionInvoker.<>c__DisplayClass4f.<InvokeActionMethodFilterAsynchronously>b__49()
at System.Web.Mvc.Async.AsyncControllerActionInvoker.<>c__DisplayClass4f.<InvokeActionMethodFilterAsynchronously>b__49()
at System.Web.Mvc.Async.AsyncControllerActionInvoker.<>c__DisplayClass4f.<InvokeActionMethodFilterAsynchronously>b__49()
at System.Web.Mvc.Async.AsyncControllerActionInvoker.EndInvokeActionMethodWithFilters(IAsyncResult asyncResult)
at System.Web.Mvc.Async.AsyncControllerActionInvoker.<>c__DisplayClass25.<>c__DisplayClass2a.<BeginInvokeAction>b__20()
at System.Web.Mvc.Async.AsyncControllerActionInvoker.<>c__DisplayClass25.<BeginInvokeAction>b__22(IAsyncResult asyncResult)</Data>
</EventData>
</Event>


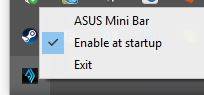
 Not 100% work related but computer related. I reinstalled my home PC last week and also installed the ASUS AI Suite 3 tools to make it easier with overclocking and handling the fans and pump for my custom liquid cooling system.