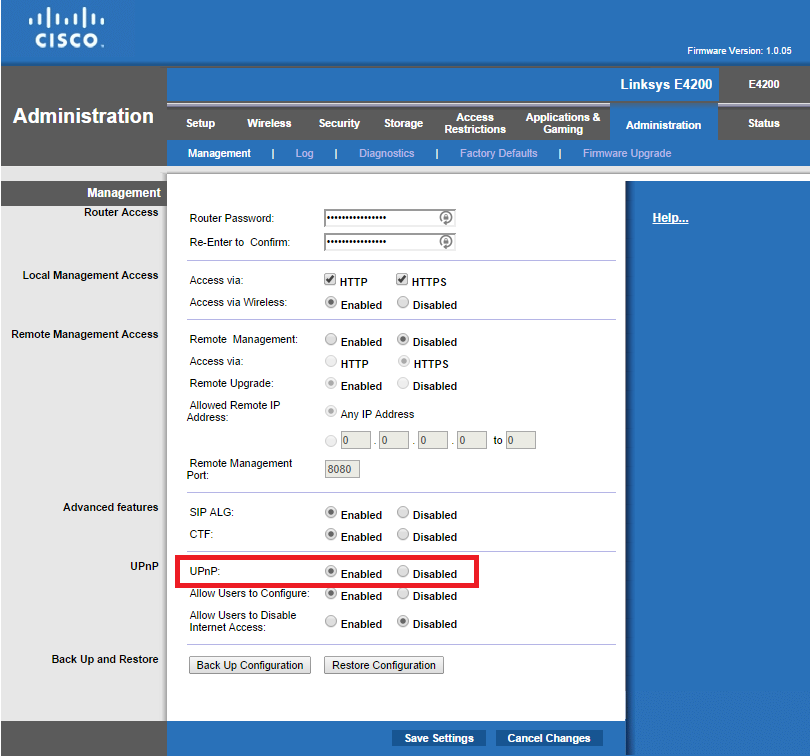
I described in my previous blog port, some NAT issues I had with using more than one xbox one in our network, especially with xbox live party chat in Destiny (and with fireteams), here: How to use multiple xbox one consoles in a network.
As my router didn’t fully support UPnP my options were to buy a new one or try to flash it with for example a DD-WRT firmware which others had confirmed mostly worked fine, depending on build. DD-WRT is an alternative firmware which gives additional features to your router.
The older router I wanted to flash didn’t support DD-WRT and I didn’t want to risk screwing up my “in production” router. So I decided to setup a virtual DD-WRT and when it was operational, replace my current router. And that worked like a charm!
Pre-Requisits:
- A computer with 2 Network cards.
- Some kind of virtualization software. You can use OpenBox or VMWare if you like, there are guides on internet on how to use those, in my case I’m using Microsoft Hyper-V which is part of Windows Server 2008 and later, but also in Windows 8, 8.1 (Pro and Enterprise) and Windows 10 (as of this writing, currently in Tech-preview).
- Possibility to connect that computer directly into the ADSL Modem. Or to take the RJ45 (Ethernet cable) you get from your ISP into that computer.
- No other NAT device in front of your new virtual router.
I had previously called my ISP and asked them to disable the Router (enable pass-through) in the ADSL Modem, so I could use my own equipment. You may have to do that too, depending on the setup.
You can verify this by connecting your computer into the ADSL Modem and see if you get a real external IP-address from any of the ports (in my modem it’s only port 4 which gives this). If the IP you get is part of these series, you’ll need to call your ISP.
10.0.0.0 – 10.255.255.255
172.16.0.0 – 172.31.255.255
192.168.0.0 – 192.168.255.255
Setup:
For now, leave your current router in place and make sure you have internet access as usual as we will need to download some things and it’s good to know that it did work before we started messing around 😉
I’m using a Windows Server 2012 R2 for this (as I had one running), but it’s exactly the same steps doing it on Windows 8.1.
To enable Hyper‑V on Windows 8.1
-
In Control Panel, tap or click Programs, and then tap or click Programs and Features.
-
Tap or click Turn Windows Features on or off.
-
Select Hyper‑V, tap or click OK, and then tap or click Close.
-
Shut down your PC, and then restart it.
Setup your Virtual Network
Start the Hyper-V Administration Tool called Hyper-V Manager.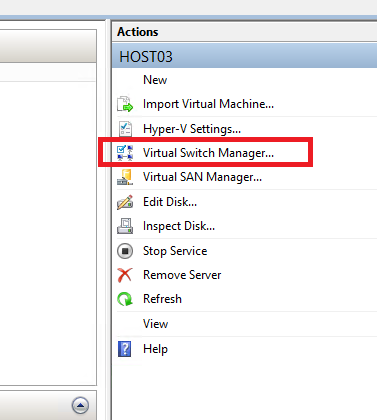 You will need to create two virtual networks, so click “Virtual Switch Manager”.
Then create two “New virtual network switches”. That makes it possible for your DD-WRT router to access the network.
We will need one network called for example; Local Area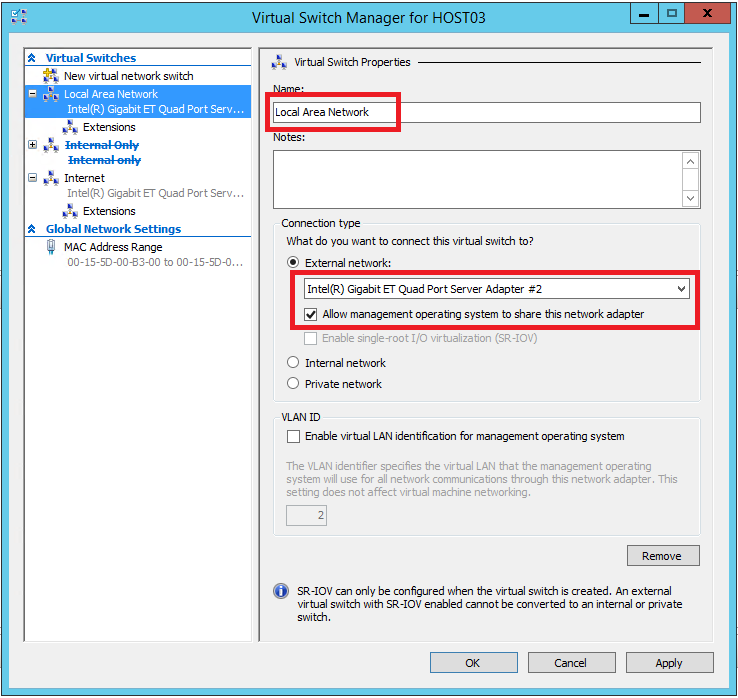 Network which looks like this. Connect that Virtual Network to the Network Card which is used by your computer today to access your Network.
Notice that “Allow management operating system to share this network adapter” is enabled on the one called “Local Area Network”. That makes it possible for your computer to use this network which is a good thing.
The second switch can be called for example; Internet. And it 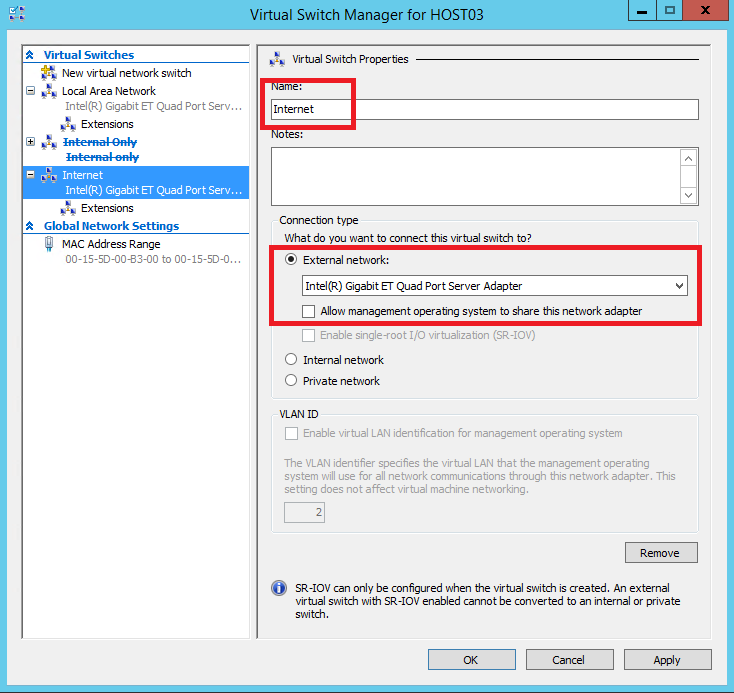 should be bound to the other network card, which was previously unused.
Make note that this should NOT have “allow management operating system to share this network adapter” checked.
We don’t want our host computer to use this network directly, or it might be the one that get’s the IP address from your ISP instead of our new virtual router. Right!
If you have done everything right so far, you should still be able to access internet from your computer.
Downloading
We will of course need to download DD-WRT, but also a tool to extract DD-WRT onto a virtual harddrive.
As of this writing, the latest version of DD-WRT available for x86 (virtualization) is a Beta from 2014-06-23 (the stable is from 2008, so I went for the Beta version).
You can download it here: ftp://ftp.dd-wrt.com/betas/2014/06-23-2014-r24461/x86_64/dd-wrt_public_vga.image
There are Full versions but you need to pay to use them, while the Public versions are free and will work in your home.
Download that image to your local harddrive and then also download this tool physdiskwrite to the same location. Which makes it possible to apply your image file onto a harddrive, we will get back to that in a minute.
Create a Virtual Machine
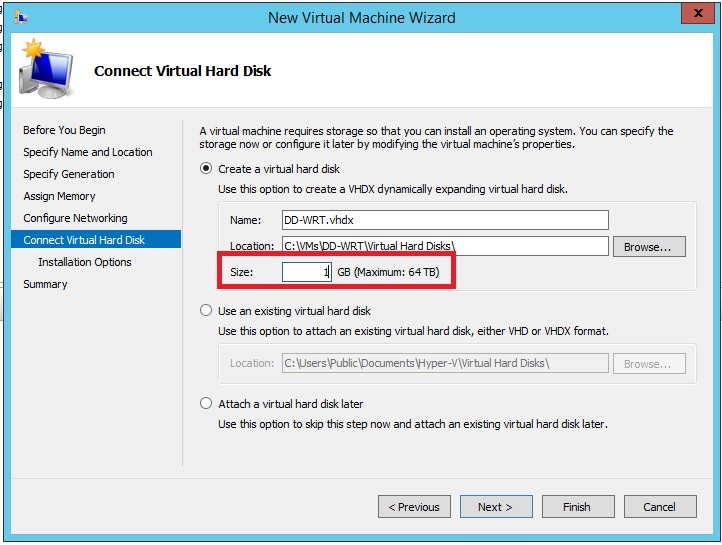
In Hyper-V manager, create a new virtual machine with these settings.
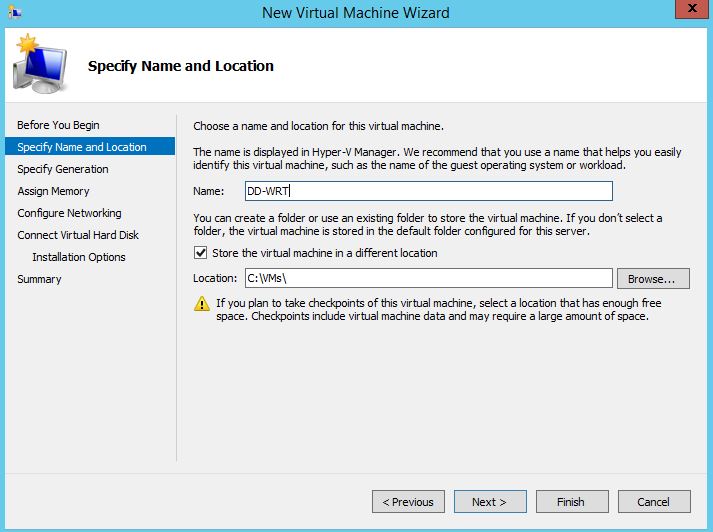
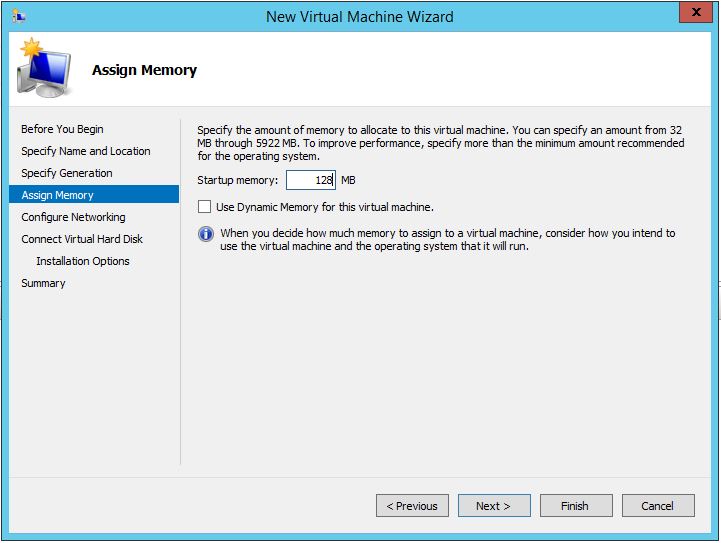
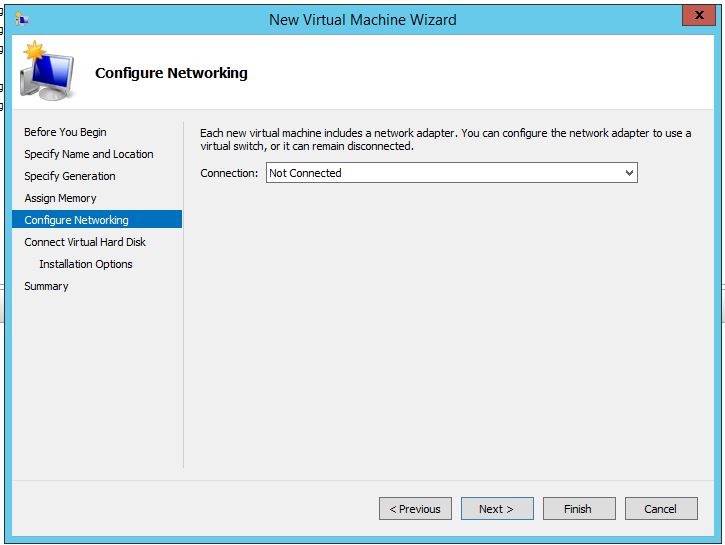
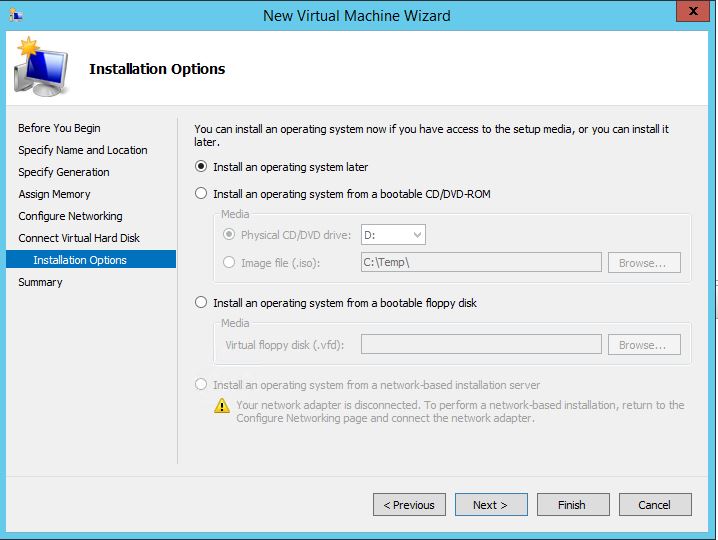
Give it about 64-128mb of RAM. Don’t connect it to a network.
Give it a 1GB harddrive, which is enough and won’t give you a warning later on.
Don’t install a operating system, and click Finish.
Now open Settings for your newly created virtual machine.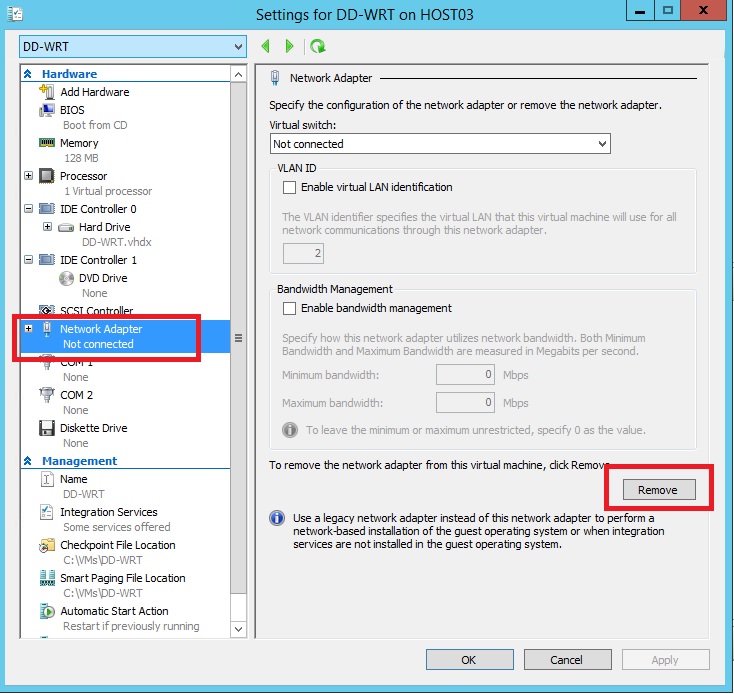 We will need to replace the Network card.
Select the existing card and then click Remove.
The reason is that DD-WRT does not have any built in drivers for this card, so we will use a Legacy card instead.
Now click on “Add Hardware” and choose to add a 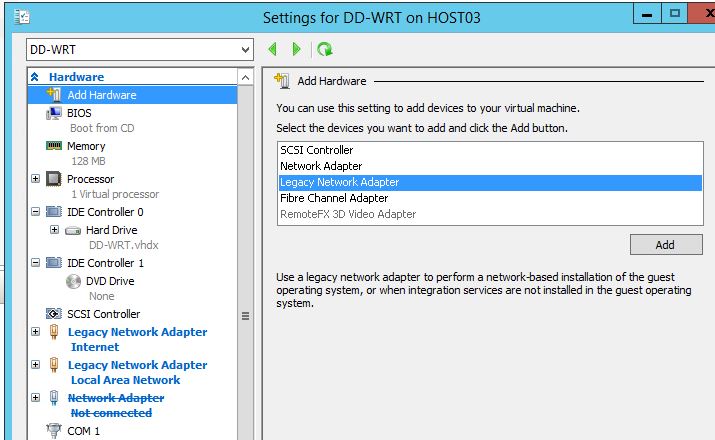 “Legacy Network Adapter” twice, so you get two Legacy Network Adapters like this.
And also click on each of those cards and connect them to a virtual switch.
It’s very important that you connect the first (upper) card to the switch called (if you named them like me) “Internet” and the second to the one called “Local Area Network” so it looks like in the screenshot.
While you are at it, you can also give the Virtual Machine one additional Processor if you want to.
Preparing the Hard disk
We will now apply the image we downloaded to the virtual harddisk you just created.
- Open Disk Management. Right click on the
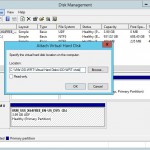 Start button and choose “Disk Management”
 - Click Action, and then “Attach VHD”
- Browse to your Virtual Harddisk you created in the Wizard, in my case it’s “C:\VMs\DD-WRT\Virtual Hard Disks\DD-WRT.vhdx”
- Click OK

If that failed, and the error was that the file is in use. I guess you were a bit eager and started your virtual machine? In that case, stop the VM and retry this step.
Now open a Command Prompt with administrative rights and navigate to where you downloaded physdiskwrite and your DD-WRT image.
Then type; 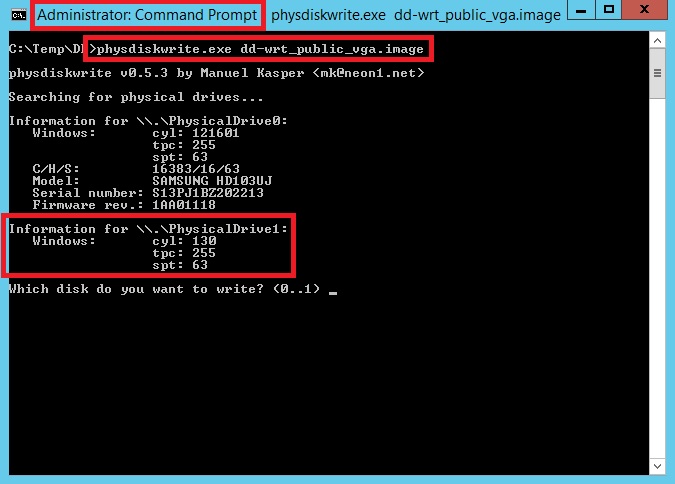 physdiskwrite.exe dd-wrt_public_vga.image
It should look something like in the picture to the right.
Important! If you pick the wrong drive here, that drive will be erased so you will loose all your files on that drive.
Normally Drive0 is the one your Operating System is installed on and it will probably have a Model and other information.
if you created a 1GB small drive just like I did, it should be easy to see which one that is by the lack of information and the “cyl, tpc and spt” should be about the same as in the picture.
Press the corresponding drive number. In my case, 1. And then Y to Proceed.
Go back to Disk Management console and in Actions menu, 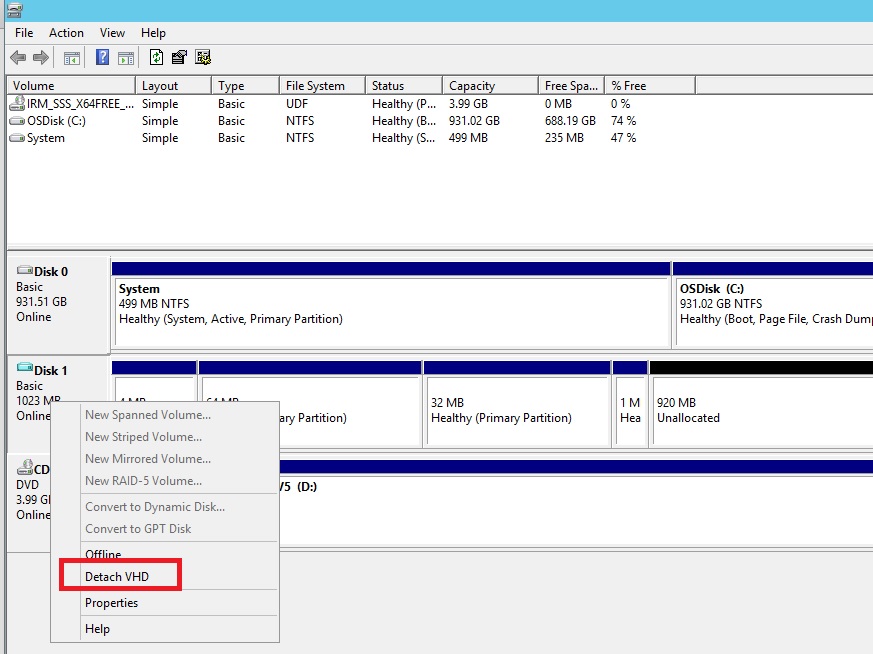 choose rescan. You should now see some partitions and information on the disk.
Right click on your drive (on the left hand where it says 1.00GB, and choose “Detach VHD”.
Booting
All done! Now in Hyper-V manager, start your virtual DD-WRT Router, and it should boot like this. 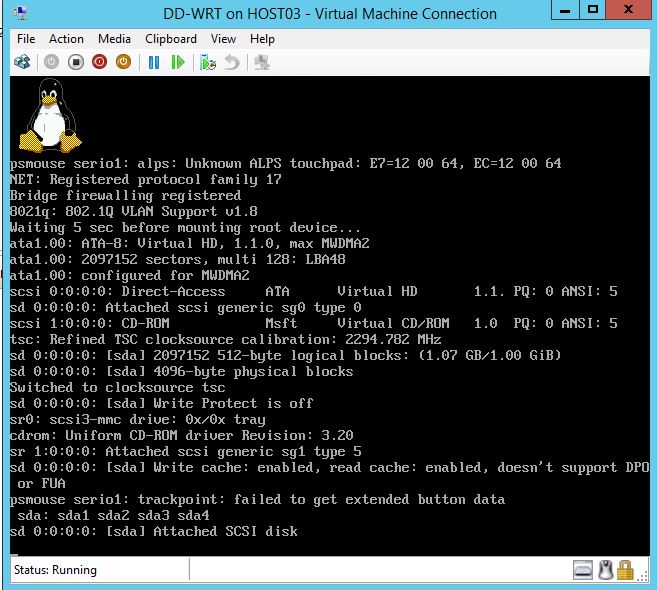
You can now access your new DD-WRT Router and configure it by using a web browser and navigate to http://192.168.1.1
You will be prompted to set a new Admin username and Password. Obviously, if your old router is using 192.168.1.1 you may have to turn that one off before you can access the new one.
Configuration
There are tons of guides on how to configure a DD-WRT Router, so I won’t go into details on that.
When you are done configuring the router, just change the network cable from your current router, into your computer and it will get a IP Address from your ISP and all clients will use that router instead.
It might take a while for your ISP to give you a new IP address, and if your old routers MAC Address is registered at the ISP you may have to call them and have them update their records.
A word of advice, configure your new DD-WRT router, to use the same Local Area Network IP-Address as your old router had. For example, if the old router had 192.168.0.1 then let the new router use the same, that will make transition smoother for your devices as they won’t have to get a new DHCP Address with the new routers information.
How about Wireless?
In this solution, I’m not using Wireless at all. I’m using another solution for Wireless though Unifi, or would use my old Wifi Router for just Wireless and connect it through the DD-WRT router like any other device.